When it comes to ensuring optimal, long-lasting performance of your V-shell blender, proper installation stands as the single most critical step. The vast majority of post-operation issues with the equipment — including excessive vibration, powder leakage, and elevated operating noise — mostly stem from non-standard, improper installation practices. Widely adopted for powder stirring and processing applications, this equipment requires a full inspection to confirm that all V-blender parts are complete and intact before any installation work commences.
Below, we deliver a complete, systematic explanation of the full installation workflow for V-shell blenders, troubleshooting solutions for common faults, and daily maintenance best practices. This guidance is formulated to ensure you can carry out smooth production, cut down on equipment failures, and extend the service life of your unit to the maximum.
一.Things to Do Before Installation
1. Site and environmental inspection
For the equipment installation, the selected site must be equipped with a level ground that has a flat, slightly smooth surface. This is to prevent abnormal vibration and noise during equipment operation, which would otherwise arise from an uneven mounting foundation. Sufficient space for equipment operation and maintenance must be reserved on site, with a recommended minimum clearance of no less than 1 meter around all sides of the unit. Meanwhile, ensure the power supply interface is arranged in a reasonable position, and the entire site is kept well away from highly corrosive substances, as well as flammable and explosive materials.
2. Equipment and Accessories Check
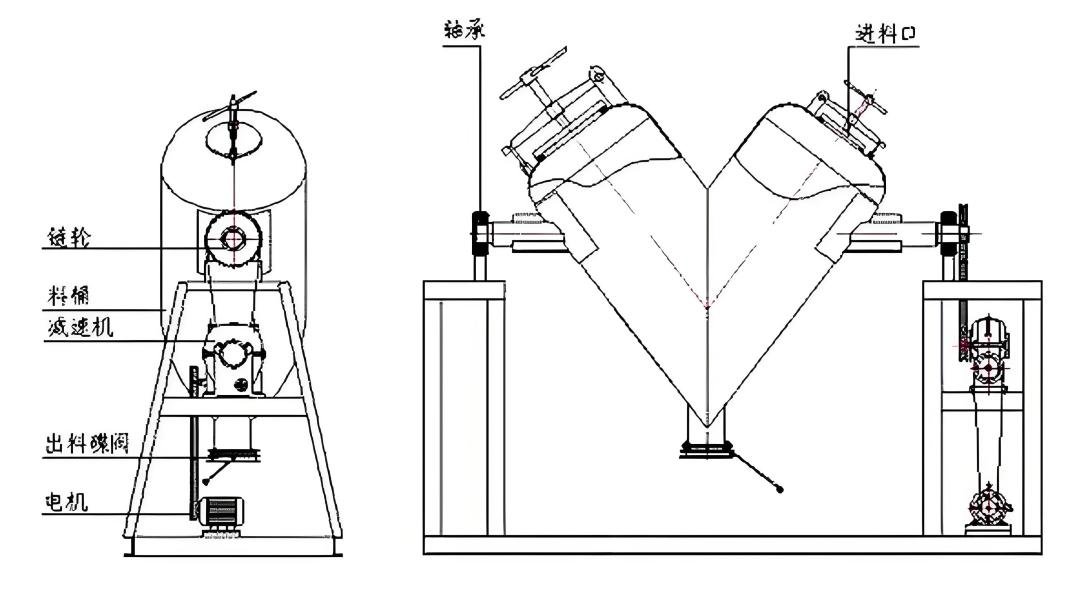
Immediately after unpacking the equipment, cross-verify all items against the official packing list to confirm that the main machine body, drive motor, gear reducer, feed and discharge valves, anchor bolts, operation manual, certificate of conformity, and electrical wiring schematics, along with all other supporting accessories, are fully accounted for and complete. Conduct a thorough visual inspection of the equipment’s main structure, tank body, and transmission components to identify any deformation, impact damage, scratches, or other defects that may have occurred during transit and handling. Special focus shall be placed on checking the tank interior for any residual foreign objects or leftover liquid and confirming that wearing parts, including bearings, sealing components, and other consumable elements, are in intact, undamaged condition with no signs of premature wear or failure.
3. Tools and Materials Preparation
Prepare and gather all tools and auxiliary equipment required for the installation, including a precision level gauge, wrench set, forklift, insulating tape, grounding cable, and other necessary installation implements. Prior to the installation process, prearrange the power supply wiring in full compliance with the requirements specified on the equipment’s nameplate. Verify that the voltage and frequency of the incoming power supply are fully aligned with the equipment’s rated technical parameters, and configure the dedicated power circuit with an independent air circuit breaker and earth leakage protection device.
二.V Powder Mixer Installation Steps
1. Position the Machine and Level It
When handling the V-type blender with a forklift, ensure the two fork tines are positioned precisely at the central section of the machine body to prevent tilting caused by off-center lifting, then lower the unit steadily onto its pre-designated mounting site. Once the equipment is firmly seated on the ground, use a precision level gauge to perform levelness calibration along both the longitudinal and transverse axes of the unit. Adjust the shims fitted under the anchor bolts to keep the equipment’s level deviation within the allowable tolerance range, ensuring the unit operates free from swaying or tilting during runtime.
2. Secure the Machine to the Floor
Upon full completion of the horizontal alignment calibration, tighten the anchor bolts to complete the initial fixation of the equipment. During the entire fastening process, strict attention must be paid to hand safety to guard against pinching and crush injuries.
3. Install and Wire the Electrical System
In strict accordance with the equipment’s electrical schematic diagram, complete the wiring of the equipment’s power supply circuits, with full confirmation that the incoming supply voltage matches the machine’s rated operating voltage. The neutral and live lines shall be connected only after clear and accurate verification of their corresponding terminals. Securely and reliably bond the equipment’s grounding terminal to a dedicated grounding device to mitigate the risks of electrostatic accumulation and current leakage hazards. Upon completion of all wiring operations, neatly organize and route all cables and implement proper insulation protection measures so as to prevent short circuits or poor contact caused by disorganized cable arrangement. Prior to energizing the equipment, perform a secondary comprehensive inspection to verify that all wiring connections are correct, secure, and firmly tightened, and confirm that all air circuit breakers inside the control cabinet are in the open (OFF) state.
4. Install the Feeding and Discharge System and Accessories
Mount the feed hopper and discharge quick-fit valves in place, ensuring all connecting joints form a tight, hermetic seal with no gaps that could lead to powder leakage during operation. For equipment fitted with pneumatic valves, complete the secure connection of the air supply piping, then conduct a full inspection to verify that the valve’s opening and closing movements are smooth, unobstructed, and fully completed to the designated end positions without jamming or incomplete actuation.
5. Perform a No-Load Trial Run
Close the main power circuit breaker, then start up the equipment to carry out a no-load trial operation. Throughout the trial run, close attention shall be paid to verifying that the equipment’s rotation direction is fully consistent with the marked indication and that the motor and gear reducer operate with normal acoustic performance, free from abnormal vibration, irregular noise, or excessive temperature build-up. In parallel, inspect all connecting joints of the equipment for loosening, and confirm that the tank body maintains smooth, stable rotation without noticeable sway or abnormal jitter.
三.Common Installation Problems and Solutions
1. Excessive Vibration or Unusual Noise
Re-calibrate the equipment’s level alignment using a precision level, tighten all anchor bolts in a uniform and symmetric sequence, and replace with thickened shims where necessary to enhance the equipment’s structural stability. Re-adjust the coaxiality of the coupling between the drive motor and gear reducer, and calibrate the radial and axial misalignment errors in strict accordance with the requirements specified in the equipment’s official operation manual. Inspect the mounting condition of the bearings, top up or replace the lubricating grease that meets the equipment’s technical specifications, and perform prompt replacement if the bearings are found to be damaged or severely worn. If the problem stems from defects in the ground mounting foundation, carry out targeted reinforcement works on the foundation or relocate the equipment to a solid, flat, and level installation site.
2. Machine Won’t Start or Is Difficult to Start
Inspect the power supply circuits to verify the correct alignment of the wiring phase sequence, ensure the incoming voltage complies with the equipment’s rated operating specifications, and confirm the cable gauge of the power supply lines is adequate to support the equipment’s full power load. Replace the power supply lines promptly if they fail to meet these requirements.Check whether the equipment’s emergency stop button is fully reset to its normal position, and inspect the circuit breakers and thermal relays inside the control cabinet for tripping. Reset all triggered protection devices to their standard operating state.Carry out a thorough inspection of the wiring terminals on the control circuits, retighten any loose wiring connections, and troubleshoot the lines to detect any open-circuit or short-circuit faults.Inspect the motor for burnout damage or phase loss malfunctions. As a final step when necessary, contact certified professional technicians to perform a comprehensive overhaul or replace the faulty motor.
3. Powder Leakage or Poor Sealing
In the event of sealing integrity failures such as powder leakage caused by inadequate sealing, the valve assembly shall be reinstalled and damaged sealing gaskets replaced, with strict verification that the gaskets are correctly seated, free from misalignment, offset, or breakage. Tighten the connecting bolts on the tank flange in a uniform, cross-symmetrical sequence to avoid insufficient sealing resulting from uneven stress distribution on local areas of the flange. When fitting a new seal, thoroughly clean the mating contact surfaces of the sealing joint to remove all residual impurities and debris prior to installation. Prepare and gather all tools and auxiliary equipment required for the installation, including a precision level gauge, wrench set, forklift, insulating tape, grounding cable, and other necessary installation implements. Prior to the installation process, prearrange the power supply wiring in full compliance with the requirements specified on the equipment’s nameplate. Verify that the voltage and frequency of the incoming power supply are fully aligned with the equipment’s rated technical parameters, and configure the dedicated power circuit with an independent air circuit breaker and earth leakage protection device.
四.Precautions for Using a V Powder Mixer
Prior to equipment startup, you must verify that no foreign objects remain inside the tank body, the feed and discharge valves are set to the correct operating status, all safety protection devices are properly fitted in place, and unauthorized personnel are kept clear of the equipment’s operating area. Overload operation is strictly forbidden. The total volume of fed materials must not exceed 60% to 70% of the equipment’s rated nominal capacity to prevent motor burnout and damage to transmission components caused by excessive load. It is strictly prohibited to open the tank’s observation port or maintenance access door during equipment operation or to insert hands or any tools into the tank interior. If equipment adjustment is required, the unit must be shut down and the power supply fully disconnected before any operation is carried out. Materials used for V-blender mixing must fall within the equipment’s applicable application scope.
Mixing of materials prone to caking, excessively corrosive, or flammable and explosive must be avoided. If special materials need to be processed via V-blender mixing, the equipment’s suitability shall be confirmed with the manufacturer in advance, and operations shall be conducted in line with the technical requirements of relevant powder mixing processes. Should abnormal vibration, unusual noise, odd odor, or powder leakage occur during equipment operation, the unit must be shut down immediately for inspection. It may only be restarted after the fault is fully eliminated, and running the equipment with unresolved faults is strictly prohibited.
五.V Powder Mixer Maintenance and Care
1. Daily Maintenance
Promptly remove residual material from the tank interior to prevent the material from moisture absorption, caking, or corrosive damage to the tank body. At the same time, wipe away dust and oil contaminants from the equipment’s external surfaces to maintain the unit in a neat and clean condition. Inspect the sealing integrity of the feed and discharge valves, clear material residue from the sealing surfaces, and avoid premature wear of the sealing components. Check all connecting joints of the equipment for loosening, with a key focus on verifying the tightness of anchor bolts, couplings, and protective guards.
2. Weekly and Monthly Maintenance
On a weekly basis, top up or replace the lubricating oil for the equipment’s bearings and gear reducers. When applying grease, the filling volume must be strictly controlled; any overflowed grease after filling shall be thoroughly cleaned to maintain the equipment in a clean condition. Inspect the lubricating oil for signs of deterioration or emulsification, and carry out a timely replacement if such abnormalities are detected. On a monthly basis, inspect the operating condition of the motor, and clear away dust accumulated on the motor’s cooling fins to ensure optimal heat dissipation and prevent burnout caused by overheating. Check the wiring terminals for oxidation or loosening, retighten all loose wiring connections, and verify the reliable connection of the grounding device to guarantee electrical operation safety. Also on a monthly cycle, clean up dust inside the frequency converter and inspect the proper functioning of its cooling fan to avoid unplanned shutdown of the converter triggered by overheat protection activation.
3. Annual Maintenance
A complete disassembly and overhaul shall be performed on the equipment, starting with inspection of the tank body and mixing components for abrasion and corrosion. Rust removal and anti-corrosion treatment shall be carried out where necessary; in the event of severe abrasion or crack formation on the tank body, timely repair or replacement is mandatory. Inspections shall be conducted on wearing parts, including bearings, seals, couplings, and belts, to assess their wear condition, with all deteriorated or damaged components replaced promptly. Comprehensive testing shall be carried out on the equipment’s drive system, electrical system, and sealing system, including verification of core performance indicators such as no-load speed, loaded speed, and mixing uniformity, to ensure the equipment’s operating performance fully meets specified requirements.
Calibration of the equipment’s levelness and coaxiality shall be completed to guarantee stable operation free of abnormal vibration. A dedicated in-depth inspection of the electrical system shall be conducted, covering replacement of aged wiring, contactors, relays, and other electrical components; verification of the tightness of wiring connections inside the control cabinet; and cleaning of accumulated dust within the cabinet, to ensure stable and reliable operation of the electrical system.
Professional inspection shall be performed on critical electrical components, including frequency converters and motors, with dedicated maintenance or replacement carried out as required. Rust removal and repainting treatment shall be applied to the equipment’s exterior surface to prevent rust and corrosion damage. The equipment’s foundation shall be inspected to confirm it remains intact, with no signs of settlement or cracking; should any defects be identified in the foundation, timely reinforcement measures must be implemented. In parallel, all maintenance and service records of the equipment shall be systematically collated and filed to provide a complete and traceable reference for subsequent maintenance and servicing operations.
七、Summary
With years of specialized focus and deep-rooted engagement in the food machinery sector, Orange Mesh is dedicated to the research and development, manufacturing, and distribution of high-grade processing equipment. Backed by industry-leading technical expertise, stringent quality control protocols, and extensive hands-on industry experience, we deliver premium machinery and complete turnkey solutions that combine stable operation, user-friendly handling, and outstanding long-term reliability.
This V-shell blender is precision manufactured from food-grade stainless steel, in full compliance with global safety and sanitation specifications. It delivers substantial improvements in production efficiency, meaningful reductions in operating costs, and consistent stability of product quality, positioning Orange Mech as a trusted, high-quality equipment partner for processing enterprises spanning the food, pharmaceutical, chemical, and other core industries.